


Neolithic sickle creation and realization of dreams
- Mar 7, 2019
- 5 min read

Fig. 1 Neolithic sickle
The idea to make neolithic sickle came to me long time ago, when I started to explore the world of experimental archaeology. At that point of my flint knapping knowledge I thought that making of such object (and the most of things I made and learned later) was impossible. At the beginning of this blog I just want to make clear that these are all my personal experiences, which can be correct and wrong. With only six years of flint knapping experience I know I have a lot to learn, but that won't stop me to share this experience with You.
First page in my sickle production started to be written when I begun to learn flint blade production. At the beginning this was my biggest challenge. I didn't have anyone to show me practical part of flint knapping , so I watched YouTube videos but there is only one video from which I could learn something about blade making. At that point I decided that I'll make videos about basic flint knapping , such as blade production or simple burin or endscraper production, which are scarce on YouTube, that comes of course when I learn how to knapp.
Anyway at some point I eventually learned how to make blades, but honestly they were not really good. When I made first sickle I was using direct percussion of flint blade production. This first sickle I made on one experimental archaeology workshop in Zadar last year. It was full of flaws but I was happy that I finally made one.

Fig. 2 Unsuccessful attempt of sickle making
Just after that workshop I went to France on another workshop that I luckily got in. The theme was flint blade production by indirect percussion, the technique I honestly thought I could never learn, turns out I just needed some help in learning the importance of angles in flint blade production. Thanks to Jeremy, Fred and bunch of other amazing people in France I learned many new things about flint knapping.
Thanks to Fred I returned home with more than just new experience, I returned with some high quality flint from Normandy and south-east of France, which is really scarce in my country.
At the beginning of summer 2018., filled with experience, knowledge and more confidence I decided to finally make one of those sickles I saw on internet. Wanting to share the experience of sickle making I asked my good friend Dejan to film the whole process and he happily agreed.
Video was filmed by the lake called Borovik on which I organized experimental archaeology workshops for the last two years. The surrounding is perfect, untouched nature, no signal for mobile phone, sound of birds and frogs, plenty of different types of woods for collecting the material for sickle, perfect environment. Dejan, my girlfriend and I went to camp and started the whole process.

Fig. 3 Borovik lake
The sickle production
I started the process by making some sort of primitive flint axe for wood chopping. Now, You might ask yourself why I didn't use more efficient polished stone axe. The answer is very simple, I didn't have material nor knowledge to make one. Clearing that out, moving on. This „axe“ I made wasn't anything special, just some working edge made by bifacial method to serve the purpose of a once time axe.
When the „axe“ was done I started to look for wood in bush nearby that would be suitable for handle from which my sickle making would start. I decided to go with dogwood, really good and thankful wood for processing. It is quite soft and it's easy to be shaped with flint blades. When I chopped this tree I realized from first hand experience why people decided to experiment with polished stone tools. When axe isn't polished edge crashes really fast and the damage gets irreparable if You don't have axe big enough to retouch the edge.
I dragged the tree in camp and started to chop the peace for the handle off with the same axe. At this point I decided to go with straight sickle instead of curved. After the peace of wood for handle was chopped off I needed some flint blades for processing the whole handle and for inserting them in handle as bladetes.
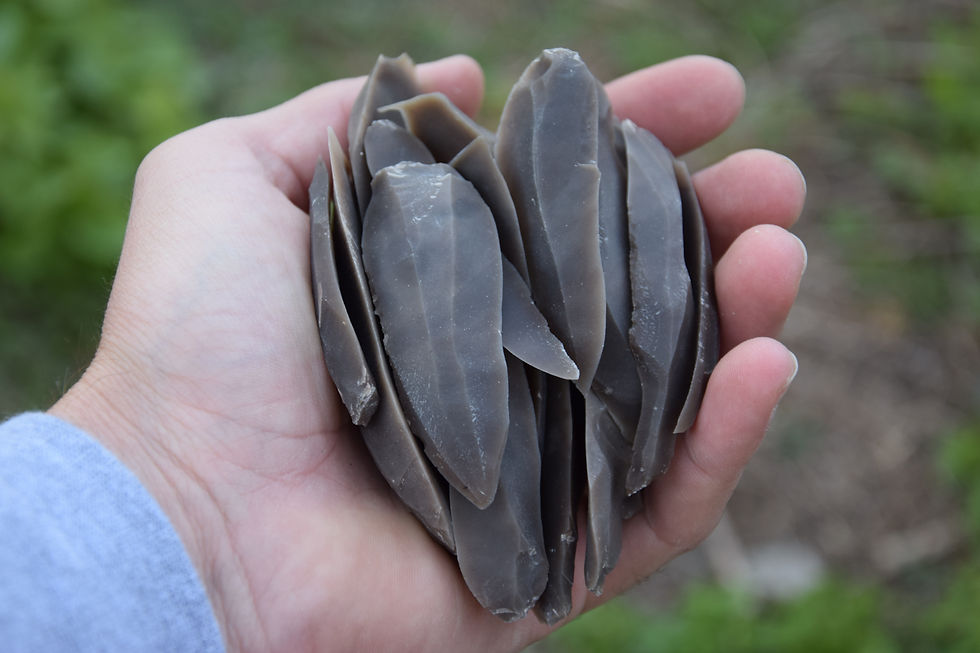
Fig. 4 Flint blades (Normandy flint)
Flint used for blade production was that one from Normandy. I decided to go with newly learned indirect technique of blade production. This technique is better than direct one because it uses more of a core. I needed antler punch, wooden hammer and stones of different hardness for preparing the platform. As the core was already prepared I simply started with preparation of platform, then I put antler punch on prepared platform and hit punch with wooden hammer, and voila, You have flint blade (more about flint blade production will be in separate blog). When the blades were produced I took one sharp blade and pealed off the bark from my future handle. After that with this same sharp blades I prepared and flattened the surface where the groove will be made and where bladetes will be fixed.

Fig. 5 Neolithic sickle - class of wheat ornament
When surface was flattened I took blade and withdrew straight line where my groove will be. Then was the time for burin making. For burin I needed blade not too thick and not too thin. On wooden anvil I prepared platform which is sidelined then I took smaller antler hammer and kicked off the burin spall. Burin was then used to groove the groove about 0,5 to 1 cm deep in which was time to insert some bladetes.
Bladetes, just as burins, are made on wooden anvil. I found couple of blades I thought could be good for my cutting edge of sickle and started to reshape them, because it is important to keep straight line of cutting edge and to keep the same height, otherwise wheat or other plants could get stuck between them.
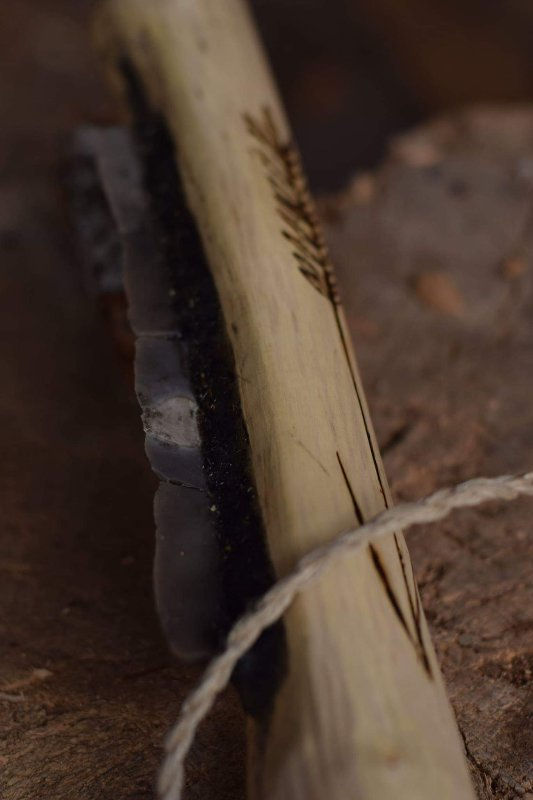
Fig. 6 Neolithic sickle - prehistoric glue
Then we come to final step in sickle making and that is making of glue and fixing bladetes in groove with it. I won't write too much about glue making because I already explained everything on that subject in another blog (Prehistoric glue making). Instead I would just want to mention how perfect Borovik place is because You can find pine trees where You have resin for glue, where You can find bush in which You have dogwood and hazelnut wood, and where You can find oak and beech woodland with intact nature and fresh springs, truly everything You need for experimentations on one place.
When the glue was made I took prepared handle and bladetes and carefully dipped them in glue and started to align them in straight line. The glue was put some more where bladetes and handle connected.
At the very end I decided to give my sickle final touch, so I tided up the sides of sickle with flint blade. On one side I just rounded it a little bit and on other side I thinned it and then drilled a hole with flint borer. Through the hole I put hemp rope made from scratch. And finally I drew class of wheat and engraved it with fire, just to make it a little more artistic. After all of that work, testing was inevitable, so I tested it on my fathers wheat field and it performed perfectly.
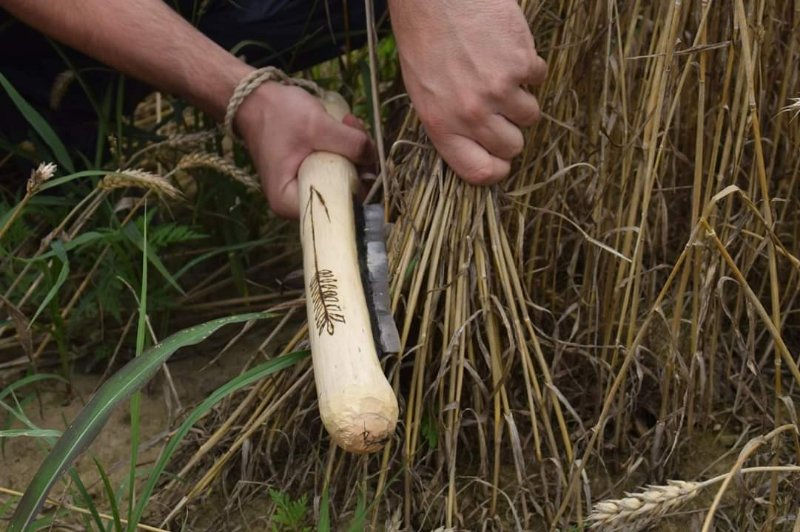
Fig. 7 Testing of neolithic sickle
I didn't want to write to You in this blog just about technical way of neolithic sickle making, but instead I wanted to share with You the whole story, from the beginnings, from the birth of the idea, trough failed attempts and finally to finished project that was truly successful, not only the making of neolithic sickle, but discovery of one mans passion and dream to become flintknapper and experimental archaeologist.
Comments